How to install Arch Linux with support for snapshots and rollback
By following this guide, you will have what is, in my opinion, the optimal setup to daily drive a rolling release distribution, such as Arch Linux.
If you have any kind of problem after updating your system, you’ll be able to boot into a previous snapshot and rollback to it, as if nothing had happened.
It’s basically like time travel for your computer, but better. Because you’ll be able to choose what gets rolled back and what doesn’t, so that you don’t lose any of your recent work.
Before we start
Requirements
- Your device must meet the system requirements of Arch Linux.
- You must have a bootable Arch Linux installation medium , such as a USB Pendrive.
Suggestions
- Attempt to follow this guide first in a Virtual Machine should anything go wrong.
- Avoid using an old Arch ISO, especially on bleeding edge hardware.
- You should have a basic understanding of Linux distributions, Arch and btrfs, although I will make my best attempt of explaining everything like you’re 5.
Assumptions
- Your PC doesn’t have Secure Boot enabled.
- Your PC is connected to the Internet via Ethernet.
Boot the live environment
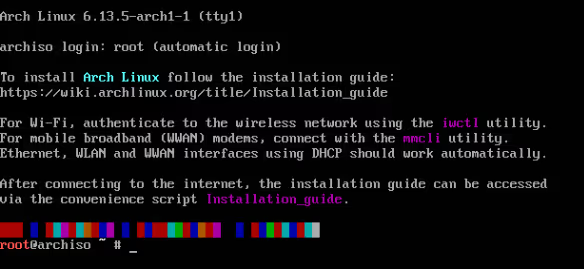
Load your preferred keyboard layout if the default (en) is not appropriate for you. You can list them all by running the following command:
If you can’t type - because your keyboard layout is different from en you can type localectl list instead and then press TAB to autocomplete to list-keymaps and then press ENTER to confirm your selection.
localectl list-keymapsFor example: As a Spaniard myself, I should choose es.
My keyboard layout is
loadkeys esDrive partitioning
Identify your target drive
Use this command to list all connected drives to your computer:
fdisk -lIn every screenshot of this post I will be referring to your target drive as /dev/sda, however, you can change the text from the post here to match yours if you’d like.
My target drive is
Create system partitions
Choosing the wrong drive here will lead to data loss. If you want to be sure that no mistake will be made, unplug all drives from your computer except the one you will be installing Arch Linux on.
I prefer using gdisk instead of fdisk as the Arch Wiki suggests because it’s designed for GPT table partitions and has a few Quailty-of-Life features that fdisk lacks. Feel free to use your preferred partition manager if you have a preference of your own.
gdisk /dev/sdaPartition 1
Create a new partition: n
Accept the default partition number (1) by pressing ENTER.
Accept the default first sector by pressing ENTER.
Set the last sector (aka: partition size) to 1 Gibibyte. Strictly speaking, this is overkill. Although it’s better to over-allocate than to cut it short, it won’t be easy to grow this partition later: 1G
Change partition type to EFI system partition using this hex code: ef00 (these are two zeros, not two letters “O”).
Partition 2
Create a new partition: n
Accept the default partition number (2) by pressing ENTER.
Accept the default first sector by pressing ENTER.
Accept the default last sector (the remainder of the disk) by pressing ENTER.
Change partition type to Linux x86-64 root (/) using this hex code: 8304 (again, that is a zero, not an “O”).
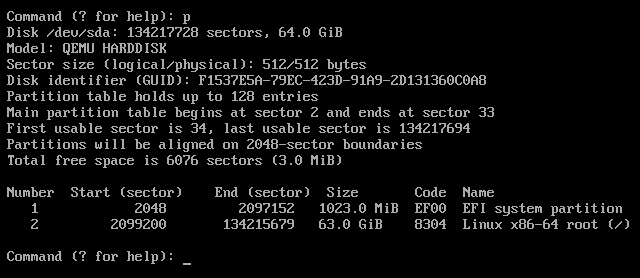
Print the current partition layout
You can print the current partition layout with: p
Write the changes to the disk
This is a destructive operation, double check that there are no mistakes in the partition layout before proceeding.
Press w to write all changes made this far to the disk.
Formatting
Format the first partition: EFI system partition
mkfs.fat -F 32 /dev/sda1Format the second partition: Linux x86-64 root (/)
mkfs.btrfs /dev/sda2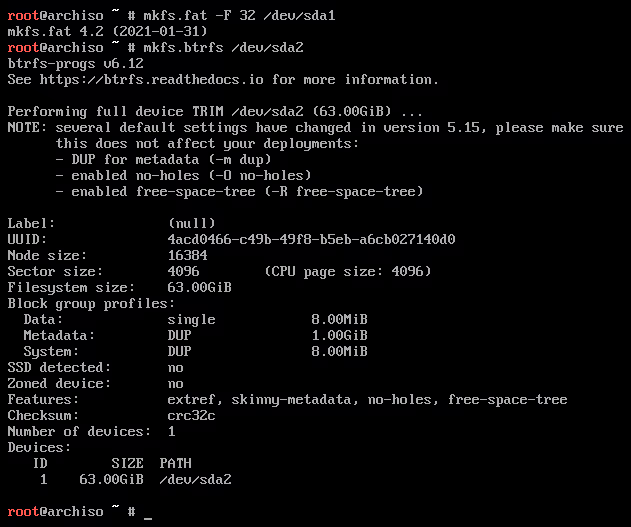
Mount the partitions
You must mount the root partition before the boot partition, otherwise your system won’t be able to boot when you finish this guide.
If you mount /dev/sda1 (EFI) before /dev/sda2 (btrfs), /dev/sda2 will shadow the first mount and therefore your system will be in an unbootable state because /dev/sda1 won’t have GRUB installed.
Mount the root partition
mount /dev/sda2 /mntMount the boot partition
mount --mkdir /dev/sda1 /mnt/boot/efiPartition results
Your partition table and mount points should look like this if you have followed every step correctly up until this point. You can verify this yourself using:
lsblk -f /dev/sda| device | filesystem | mountpoint |
|---|---|---|
| /dev/sda1 | FAT32 | /mnt/boot/efi |
| /dev/sda2 | btrfs | /mnt |
Create Btrfs subvolumes
What are they and how do they differ from partitions
In a nutshell, partitions are logical sections of a drive that have independent file systems, mount points and files/directories.
Subvolumes are similar to partitions in the sense that are also logical sections of a drive with independent mount points. However, the file system (btrfs) is shared between all subvolumes created on that partition and files/directories may be shared between different subvolumes.
For example, if you create the following partition layout, each partition will have different file systems and the storage will be specific to each one.
| mountpoint | filesystem | device | size |
|---|---|---|---|
| / | btrfs | /dev/sda2 | 200 GiB |
| /home | btrfs | /dev/sda3 | 299 GiB |
| /boot/efi | fat32 | /dev/sda1 | 1 GiB |
Whereas a functionally identical layout using subvolumes will share the storage of the same btrfs filesystem between all mount points.
| mountpoint | filesystem | device | size |
|---|---|---|---|
| / | btrfs | /dev/sda2 | 499 GiB |
| /home | btrfs | /dev/sda2 | 499 GiB |
| /boot/efi | fat32 | /dev/sda1 | 1 GiB |
Suggested layout
TLDR: Don’t create a subvolume of /var.
I made my first installation of Arch Linux with btrfs and snapper by following a Fedora guide (linked below) and adapting bits here and there to make it work on Arch Linux.
While doing so, I made the grave mistake of making a subvolume out of /var, which is, by the way, the default on OpenSUSE Tumbleweed (the project that created snapper).
“Why is that a mistake?” - You may ask.
Data stored in subvolumes is excluded from snapper snapshots on the root directory, you must make a separate snapper configuration for every additional subvolume to have snapshots in there too. Which is a problem when the default database location for pacman is /var/lib/pacman.
This meant that every time I rolled back my system to a previous snapshot, pacman still believed that the latest versions of those packages were still installed.
Put it another way, even though the root directory and every file in it was indeed rolled back successfully, pacman was not aware of that fact.
Because pacman believed that the latest versions of packages were installed, It would not update old package files on the filesystem, which is equivalent to executing sudo pacman -Sy packagenames, and partial upgrades are explicitly not supported in Arch Linux.
Over time, small defects accumulated into KDE Plasma shitting itself every time I ran sudo pacman -Syu. And believe me when I say it was not easy to figure out everything I have explained here.
Btrfs subvolume names are not required to match their mountpoint, although by doing so it’s much easier to know what goes where.
Now comes the “fun” part, creating and mounting all the subvolumes individually. Which can be done by executing the following commands for each subvolume.
# Don't copy this snippet just yet
btrfs sub create --parents /mnt/home
mount -t btrfs /dev/sda2 /mnt/home -o subvol=/home
Luckily, this task can be easily automated with a bash script.
This subvolume layout is meant for use with SDDM + KDE Plasma, you must make changes if you plan to use GDM + GNOME or any other DE/WM.
SUBVOLUMES=(
    "/home"
    "/var/log"
    "/var/tmp"
    "/var/cache"
    "/var/crash"
    "/var/lib/AccountsService"
    "/var/lib/sddm" # you can skip this if you won't use sddm
    "/var/lib/portables"
    "/var/lib/machines"
)

for SUBVOLUME in "${SUBVOLUMES[@]}"
do
    btrfs sub create --parents "/mnt$SUBVOLUME"
    mount -t btrfs /dev/sda2 "/mnt$SUBVOLUME" -o rw,relatime,compress=zstd:1,ssd,discard=async,space_cache=v2,subvol="$SUBVOLUME"
done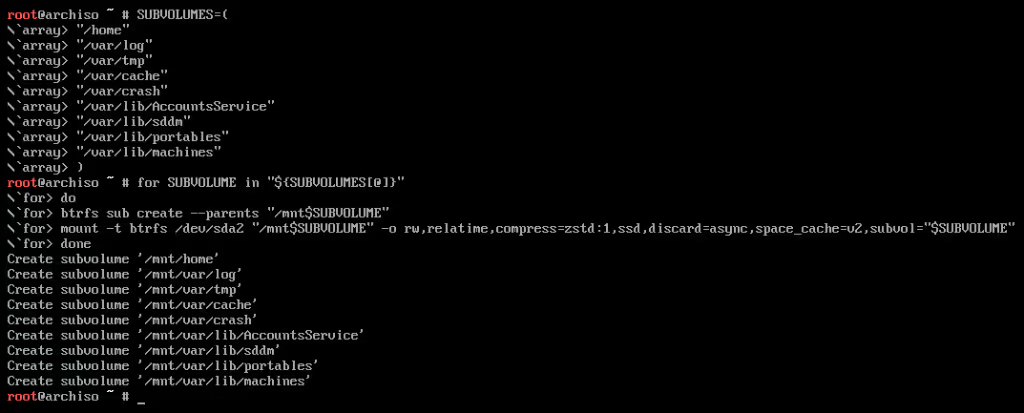
Subvolumes results
You can verify if everything went smoothly by running findmnt -t btrfs /dev/sda2

Configure the system from outside
These commands must be executed from the live environment itself. You shouldn’t need to do anything unless you return here from the next section.
Install initial packages
pacstrap -K /mnt base linux-zen linux-zen-headers linux-firmware btrfs-progs sudo networkmanager nano grub grub-btrfs inotify-tools snapperlinux-zen,linux-zen-headers: This is my preferred kernel due to being tuned for desktop linux and making Waydroid easier to run. There are other kernels available to choose.btrfs-progs: Btrfs filesystem utilities (You’ve been able to usebtrfscommands because the Arch ISO has this package installed by default).grub-btrfs:grubextension to support booting from btrfs snapshots.inotify-tools: Used bygrub-btrfsto regenerategrub.cfgautomatically when new snapshots are created.snapper: CLI utility to manage btrfs snapshots more easily
Generate fstab
This command will scan every current mountpoint of /mnt and save it to /etc/fstab relative to the new root filesystem (/mnt).
genfstab -U /mnt >> /mnt/etc/fstabConfigure the system from inside
Every command inside this section must be executed from within the newly created filesystem. To do that, run this command:
arch-chroot /mntUsers and Groups
(Optional) Set a root password
Run passwd as root to set your password. This step is not mandatory, as you can always elevate to a root shell as a regular user using sudo.
Enable sudo for users other than root
When you install sudo on Arch Linux no user besides root can use it by default (It probably is that way to avoid unintended behavior).
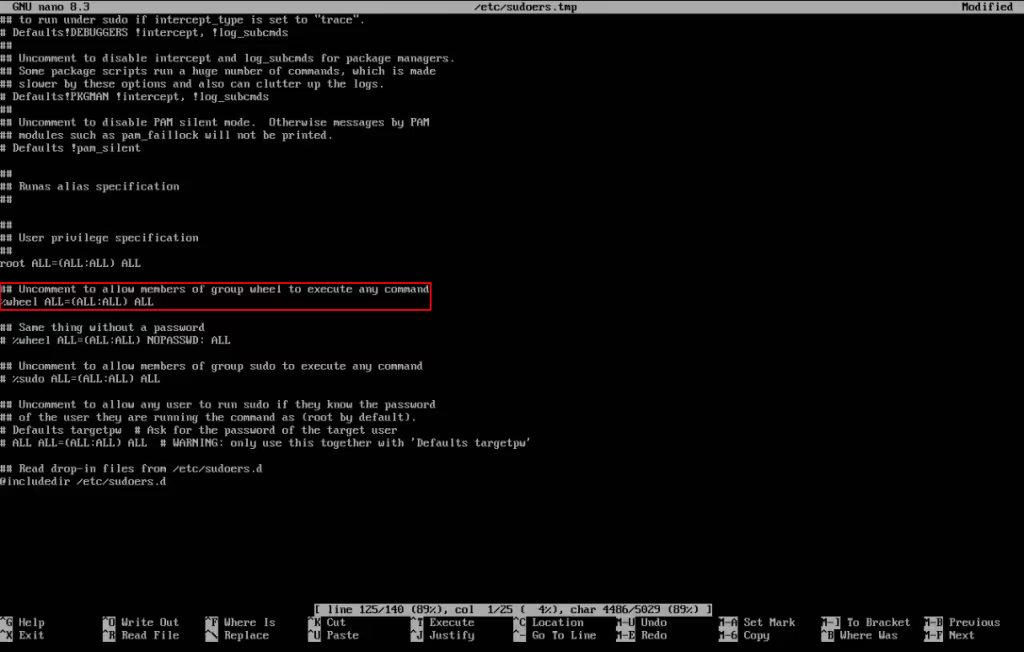
To change that, edit /etc/sudoers using EDITOR=nano visudo and add the following line:
%wheel ALL=(ALL:ALL) ALLWhich means: Allow any user in group wheel to run any command as root using sudo as long as they provide their password.
Save the file using Ctrl+X and then press Y to confirm.
Create an unprivileged user
My username is
The first command creates a user, its home directory (/home/zlendy) and adds them to the wheel group. The second one sets their password.
useradd -m -G wheel zlendy
passwd zlendy
Time and Localization
If you don’t know your timezone, you can run the following command to get it based on your IP address:
curl https://ipapi.co/timezoneSet the local time of your system.
ln -sf /usr/share/zoneinfo/{CONTINENT}/{CITY} /etc/localtimeAs an example, I would set Continent to “Europe” and City to “Madrid”.
ln -sf /usr/share/zoneinfo/Europe/Madrid /etc/localtimeRun hwclock to generate /etc/adjtime
hwclock --systohcRun nano /etc/locale.gen and uncomment at least en_US.UTF-8 UTF-8. Uncomment any other locales as needed. (Tip: You can search in nano using Ctrl+W).
After you finish save the file and run locale-gen.
Run nano /etc/locale.conf and set the LANG variable to your preferred locale from before. Set it to en_US.UTF-8 if you don’t have any preference.
Run nano /etc/vconsole.conf and set the KEYMAP variable to es. This change makes it permanent so you won’t need to set it again.
Network configuration
You’ve had network connectivity throughout this guide thanks to the Arch ISO, but that won’t be the case when you boot natively into your system unless you execute this:
systemctl enable NetworkManagerRun nano /etc/hostname and type your desired hostname, if you don’t do this it will be assigned to “archiso” by default.
Grub
Install grub to EFI system partition. Mark it as removable to create a .efi file and therefore make the system easier to boot into in case you change your motherboard.
grub-install --target=x86_64-efi --efi-directory=/boot/efi --removable
grub-mkconfig -o /boot/grub/grub.cfg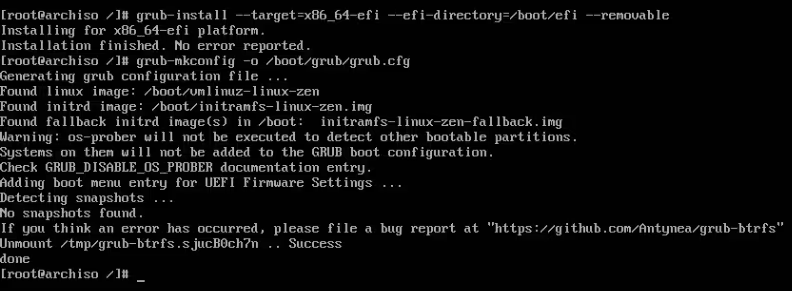
First boot to your new Arch install
Get out of the chroot using exit.
Unmount every partition in /mnt recursively using umount -R /mnt.
Shutdown the live environment using poweroff and unplug its installation media to avoid booting into it again accidentally. Then power on your computer again.
Log back in as root, if you didn’t set up a root password earlier you can elevate to a root shell using:
sudo -iSnapper
This is a CLI tool to create and manage btrfs snapshot created by SUSE.
Create snapper configs
These commands will create a .snapshots subvolume in / and /home respectively.
snapper -c root create-config /
snapper -c home create-config /home
These newly created subvolumes won’t be mounted by default unless you add them to /etc/fstab. Replace {ROOT_UUID} with the UUID of the other btrfs subvolumes.
To avoid typing all of that by hand you can open the file with nano /etc/fstab, copy a line using Alt+6 and paste it using Ctrl+U. Don’t forget to change the mountpoint and subvol to /.snapshots and /home/.snapshots respectively.
# /etc/fstab
# Append these lines

UUID={ROOT_UUID}    /.snapshots    btrfs    rw,relatime,compress=zstd:1,ssd,discard=async,space_cache=v2,subvol=/.snapshots
UUID={ROOT_UUID}    /home/.snapshots    btrfs    rw,relatime,compress=zstd:1,ssd,discard=async,space_cache=v2,subvol=/home/.snapshots
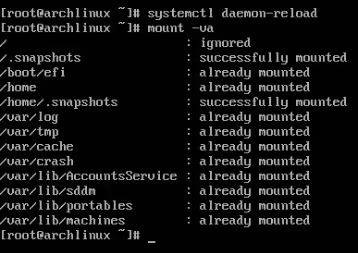
After you’re done run systemctl daemon-reload and then mount -va.
Configure user permissions
Run these commands to be able to run snapper commands as your unprivileged user without using sudo.
snapper -c root set-config ALLOW_USERS=zlendy SYNC_ACL=yes
snapper -c home set-config ALLOW_USERS=zlendy SYNC_ACL=yes
Create an initial subvolume
This will allow you to perform your first rollback should you ever need it.
snapper create -d "Initial subvolume" --read-writesnapper {SUBCOMMAND} is the same as snapper -c root {SUBCOMMAND}
snapper create by default makes snapshots, in other words, read-only subvolumes.
Just this once, you will need to add a flag to create it in read-write mode. Do not do this regularly, it is a bad practice to modify btrfs snapshots.

Change the default subvolume of / to /.snapshots/1/snapshot
SNAPSHOT_ID="$(btrfs inspect-internal rootid /.snapshots/1/snapshot)"
btrfs subvolume set-default $SNAPSHOT_ID /Reboot your computer before going on with the guide. Otherwise any further progress you make will be undone.
Create snapshots automatically
Snapshots not only give you the means to restore system data, they also allow you to restore your data.
Therefore, it is advisable to create snapshots automatically every now an then, so in the unfortunate scenario that you delete data you shouldn’t have deleted, you can easily recover it.
Enable the following services to create snapshots at certain moments of the day (snapper-timeline) and every time you turn on your computer (snapper-boot).
grub-btrfs is a daemon which will regenerate GRUB every time a snapshot is created or removed.
systemctl enable --now snapper-timeline.timer snapper-boot.timer grub-btrfsdYou may want to create snapshots every time you install or uninstall a package. By installing snap-pac, a hook will be added to pacman which creates pre/post snapshots on every pacman transaction.
These are a special kind of snapshot that should always be created in pairs. They represent the state before and after a change is made respectively.
pacman -S snap-pacTesting snapshots
At this point, the system should be perfectly suitable for daily usage. But don’t stop reading just yet! You should test if booting into a snapshot and rolling back works before finding it out the hard way.
Recover data from a snapshot
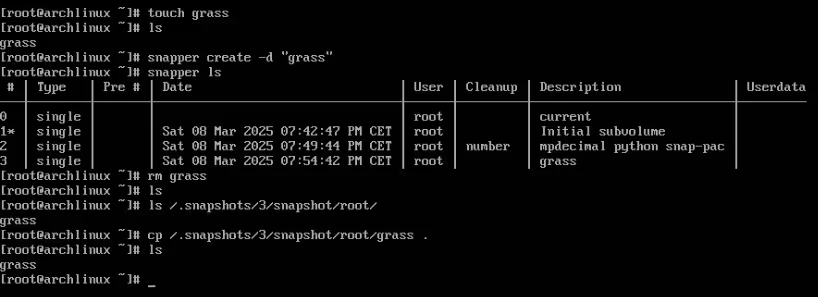
Browse the contents of .snapshots/{SNAPPER_ID}/snapshot and copy any file or directory found there to another writable location. Substitute {SNAPPER_ID} with the numerical ID of the snapshot you wish to access.
If the data you wish to recover is contained in /home you should go to /home/.snapshots, otherwise go to /.snapshots.
Remember that / and /home are different subvolumes and as such have different snapshots each (you can check that using snapper -c root ls and snapper -c home ls).
The image below shows an example of data recovery using btrfs subvolumes, feel free to experiment and tinker with alternative methods.
Boot into a snapshot
Make any change that is easily noticeable in / (not /home), such as installing a package before going on. In this example I installed cowsay.
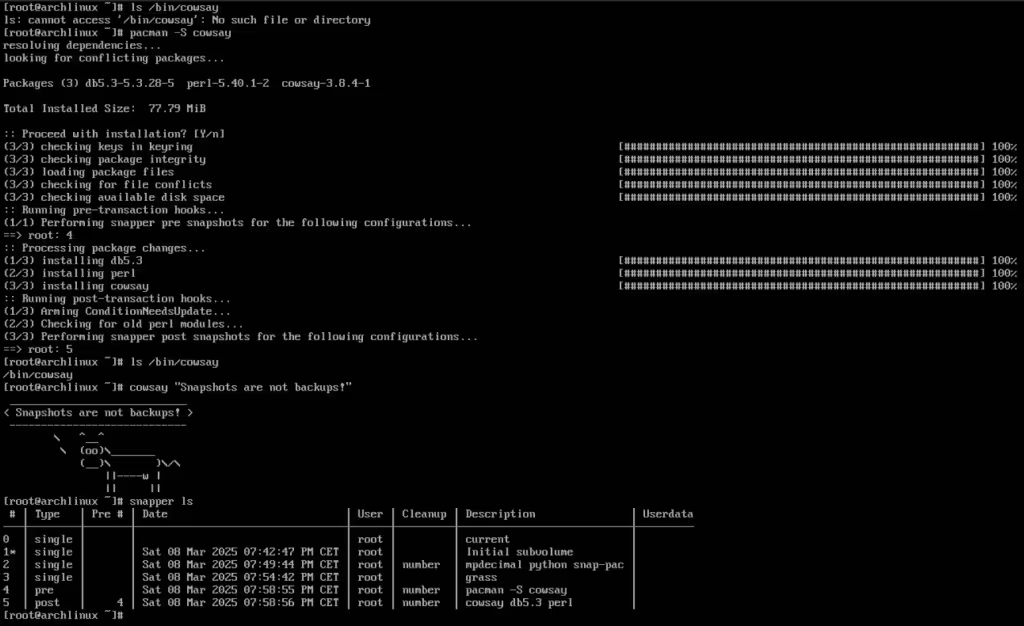
Reboot the system. You will notice there’s an additional GRUB menu named “Arch Linux Snapshots” just below “Reboot into UEFI”. Select any entry created prior to your change in that list and boot into it.
When you do, that filesystem will be mounted in read-only mode. Meaning that no packages can be installed, removed, upgraded, etc.
After I boot into snapshot number 4, cowsay is gone.

What do those symbols beside snapshot IDs mean in
snapper ls?
| Symbol | Marked as default subvolume | Currently booted subvolume |
|---|---|---|
* | Yes | Yes |
+ | Yes | No |
- | No | Yes |
Roll back to a previous snapshot
You should only execute this command when currently booted into a snapshot.
snapper rollbackThat command will do the following:
- Create a read-only snapshot of the subvolume currently in use.
- Create a read-write snapshot of the previous one.
- Set the default subvolume of / to the read-write snapshot created in step 2.

Select “Arch Linux” and press e.
Manually edit the number of the subvolume to the newly created one and boot it using F10 or Ctrl+X.
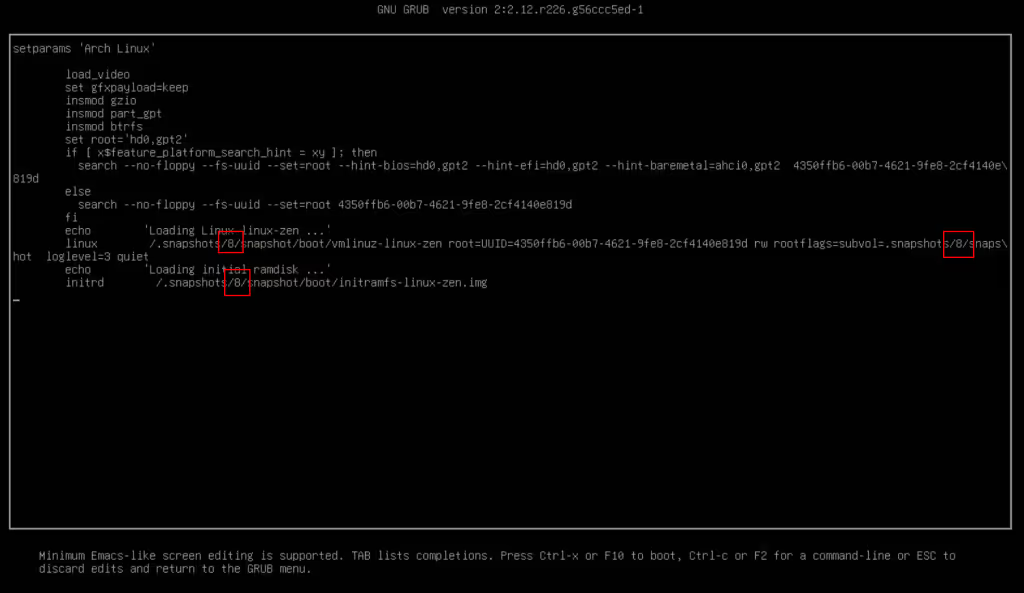
You must reinstall GRUB every time you roll back.
Deleting old snapshots
There are timers that delete snapshots automatically for you, but sometimes you will need to manually delete a snapshot to recover storage ASAP.
Fortunately, that’s an easy task. You can just run:
snapper -c {CONFIG} rm {SNAPPER_ID}
snapper -c {CONFIG} rm {SNAPPER_ID_1}-{SNAPPER_ID_2}
Just don’t delete the snapshot that GRUB is currently using to load the configuration files (the one marked in snapper ls with a * or +), if you want to have a bootable system, that is.
Acknowledgements
This guide was created with the assistance of:
- Arch Wiki: Installation guide
- Arch Wiki: Btrfs
- Arch Wiki: GRUB
- SysGuides: How to Install Fedora 41 with Snapshot and Rollback Support
Afterword
Note that btrfs snapshots ARE NOT backups by themselves, you’d need to send them to a different storage media using, for example, btrfs send.
And that concludes this guide, the first one I make, actually. If you have any suggestions or find any errors please let me know in the comments section below or contact me directly on social media so that I can fix it. Thank you for reading!